
When Minesweeper Forces You to Guess: Logic, Probability, and the Safest Move
You know that moment in Minesweeper when you've checked every number and still can't find a safe square?
You might be missing a clue. Or you might actually have to guess.
The trick is knowing the difference. And when you really do have to guess, there's a way to improve your chances.
First, look for a move you can prove
Every number in Minesweeper tells you how many mines are touching that square, including diagonally.
A 1 means exactly one neighboring square contains a mine. A 2 means two, and so on.
Sometimes you can combine those numbers to work out exactly where a mine must be.
Take this small board:
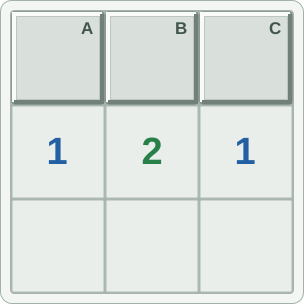
Show the forced safe square
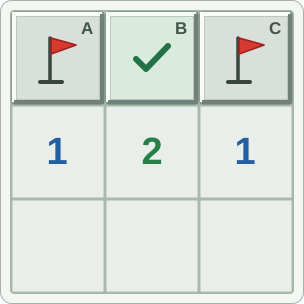
We need to figure out which of the three covered squares is safe.
Look at the left 1. It tells us that either A or B contains a mine.
The right 1 tells us that either B or C contains a mine.
Now look at the middle 2. It needs two mines touching it.
What if B were a mine?
That would satisfy both 1s, which means A and C would have to be safe. But then the middle 2 would only have one mine touching it.
That can't be right.
So B is safe, and A and C must contain mines.
No guessing needed. We've proved it using the numbers.
Sometimes there really is no safe answer
Now look at this board. There's exactly one mine remaining.
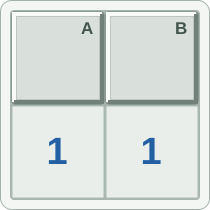
Show the 50/50 odds
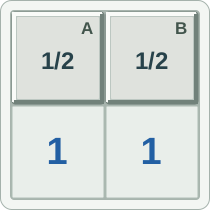
Both 1s are touching A and B. We know one of those squares contains a mine, but there's nothing here telling us which one.
There are only two possibilities.
| Possibility | A | B |
|---|---|---|
| 1 | Mine | Safe |
| 2 | Safe | Mine |
Both possibilities fit the clues.
Assuming normal random mine placement, each square has a 50% chance of being safe.
This is a genuine 50/50.
You can study these numbers all day and you still won't know which square is safe. There simply isn't enough information.
But before deciding you're stuck, make sure you've checked the rest of the board.
Don't forget the mine counter
Sometimes the clue you need isn't another number. It's the number of mines remaining.
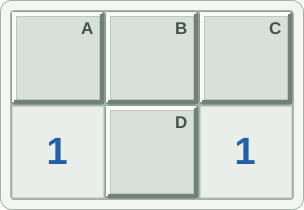
Here's another small board with exactly two mines in total.
Show what the mine total proves
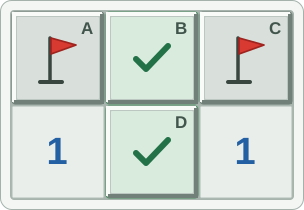
The left 1 tells us there's one mine among A, B, and D.
The right 1 tells us there's one mine among B, C, and D.
Notice that B and D touch both 1s.
If either B or D contained a mine, that single mine would satisfy both numbers. A and C would then have to be safe.
But we know there are two mines on this board, not one.
That means A and C are mines, while B and D are safe.
Without knowing the mine total, we couldn't make that deduction.
This is a good habit to develop. Before taking a risky guess, check whether the remaining mine count tells you something the nearby numbers don't.
What if you really have to guess?
When there's no move you can prove is safe, your next best option is to figure out which squares are least likely to contain mines.
Let's use one more example.
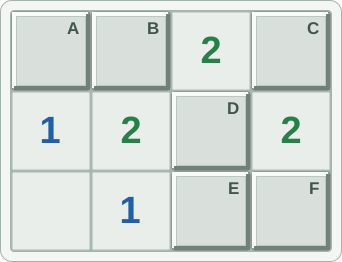
This board has three mines. Six squares are still covered.
Show the safety odds
There are several ways the mines could be arranged, but most would break one of the revealed numbers.
In fact, only three arrangements work.
| Possibility | Squares containing mines |
|---|---|
| 1 | A, C, D |
| 2 | B, C, E |
| 3 | B, D, F |
Now we can compare our options.
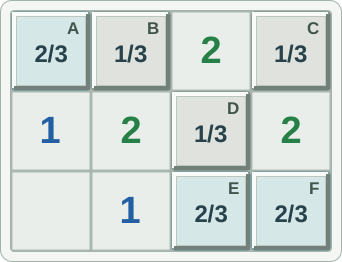
A is safe in two of those three possibilities. So are E and F.
B, C, and D are each safe in only one possibility.
| Squares | Chance of being safe |
|---|---|
| A, E, F | 66.7% |
| B, C, D | 33.3% |
If we have to choose, A, E, or F gives us the better chance of surviving.
That's all probability is doing here. We're counting how often each square is safe across the possible boards.
These exact percentages assume each compatible mine arrangement is equally likely, which is appropriate for ordinary uniform random mine placement. Some Minesweeper versions use different board-generation rules.
There's still a catch.
A 66.7% chance of being safe also means a 33.3% chance of hitting a mine.
The best guess can still be wrong.
And while one square may give you the best chance of surviving your next click, another might reveal more useful information afterward. Those aren't always the same thing.
A few things to check before guessing
When you're stuck, try this:
- Look over your flags. If you've marked something incorrectly, it could be throwing off your deductions.
- Compare nearby numbers. Two or three clues together may reveal something that isn't obvious from just one.
- Check the remaining mines. Sometimes the mine counter eliminates possibilities.
- Look for the safest choice. If nothing is guaranteed, think about which square has the lowest chance of containing a mine.
Also, don't assume that two covered squares next to a 1 automatically make a 50/50. Other clues elsewhere on the board might change the odds.
So, does Minesweeper force you to guess?
Sometimes, yes.
On a standard randomly generated board, you can end up in a situation where there's no way to prove which remaining square is safe.
Other versions of Minesweeper are designed to avoid forced guesses, so the answer can depend on which game you're playing.
The important thing is to know when you've run out of logical deductions and when you've simply missed one.
A lucky guess doesn't necessarily mean you made a smart decision. And losing on the safest available move doesn't mean you played badly.
The goal is to make the best decision with the information you have.
Use logic when you can. When you can't, use probability to give yourself the best chance.
Want to practice? Head over to Uncle's Light Sweep and try working out why a square is safe before you click it. You might be surprised how many apparent guesses turn out to have a logical answer.