

Nonograms: How to Find Your First Guaranteed Squares
A fresh Nonogram can be intimidating.
You've got a grid full of empty squares, numbers running along the sides, and absolutely no idea what picture you're supposed to make.
The good news? You don't need to know what you're drawing.
You just need to know which squares have to be filled.
That's what makes Nonograms such satisfying logic puzzles. Every number is a clue, and every deduction helps narrow down the next one.
First, understand what the numbers mean
The numbers beside a row or above a column tell you how many consecutive squares must be filled.
A clue of 3 means three filled squares together.
A clue of 3, 1 means something different: first a group of three, then a separate group of one.
There must be at least one empty square between those groups, and they must appear in that order.
That's important. The numbers aren't simply telling you how many squares to fill. They're telling you how those squares are arranged.
Start with what can't move
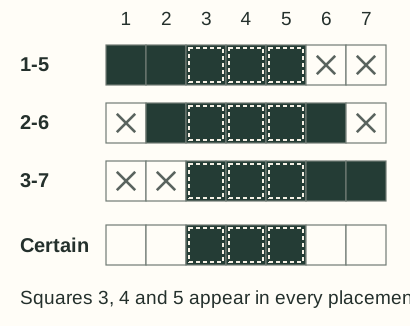
Imagine a row containing seven squares with the clue 5.
You need five consecutive filled squares, but you don't know where the group begins.
It could occupy squares 1 through 5, 2 through 6, or 3 through 7.
Here's the interesting part.
Every possible arrangement includes squares 3, 4, and 5.
So even though you don't know where the entire group belongs, you already know three squares that must be filled.
That's called an overlap deduction.
You don't have to know the whole answer to know part of it with certainty.
Long clues are particularly useful because they have less room to move.
Don't forget the required gaps
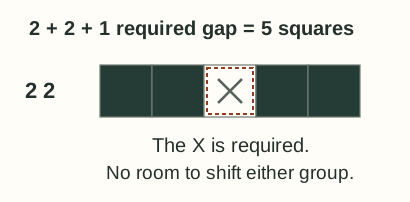
Now imagine a row with five squares and the clues 2, 2.
The first group needs two squares. The second needs another two. And they must have at least one empty square between them.
That's five squares altogether.
There is only one possible arrangement:
■■ × ■■
Two filled squares, one empty square, and two more filled squares.
You can complete that entire row immediately.
This is why it's worth looking for rows and columns where the numbers, plus their required separating spaces, use up all the available room.
Let the rows and columns help each other
Here's where Nonograms become especially interesting.
Imagine a small five-by-five puzzle.
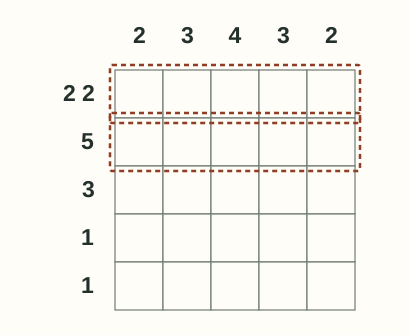
One row has the clues 2, 2, so you fill its two groups and mark the middle square empty.
Another row has the clue 5, so every square in that row is filled.
Show the two completed rows
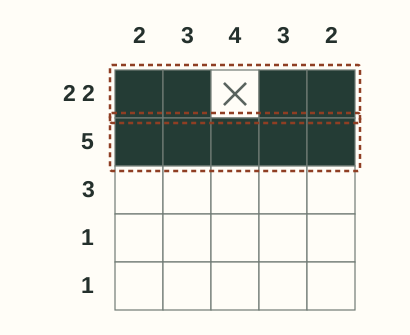
Now look at the first column. Its clue is 2, and those two rows have already given you two consecutive filled squares.
That column is finished. Every other square in it must be empty.
The last column works the same way.
Show what the outer columns tell us
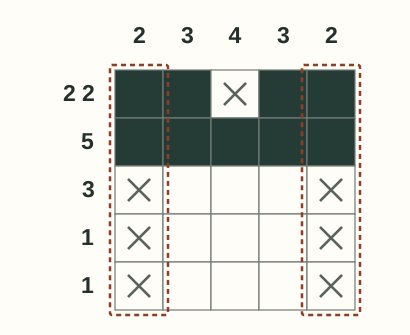
Suddenly, a row with the clue 3 has both ends ruled out.
The only place its three filled squares can go is in the middle.
Show the guaranteed middle squares
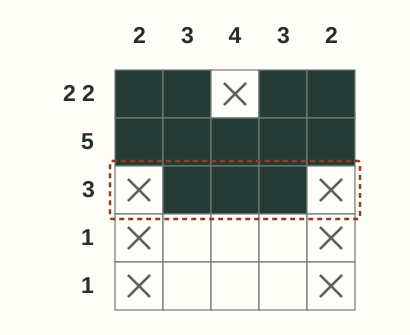
One deduction led to another, and the puzzle is beginning to solve itself.
That's the habit to develop: whenever you learn something from a row, check what it tells you about the columns. Then come back to the rows.
Optional: see the completed teaching puzzle
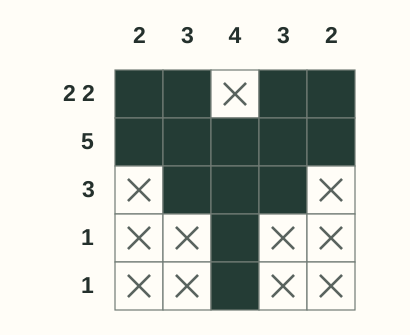
Columns 2 and 4 now have their groups of three. Mark their remaining cells X. Each bottom row then has room for its single fill only in the center.
Empty squares are clues too
It's easy to focus only on the squares you need to fill.
But knowing that a square must remain empty can be just as useful.
An X isn't a failed move. It's information.
If you've completed all the required groups in a row, the remaining squares must be empty.
If a group has reached its required length, it cannot continue into the next square.
And if a small gap cannot fit any remaining group, that gap may be ruled out entirely.
Marking these spaces helps you avoid accidentally joining groups that must stay separate.
Just remember the difference between a square you've proved empty and one you simply haven't figured out yet.
What if nothing looks obvious?
You won't always find an entire row ready to solve.
That's normal, especially on larger puzzles.
When you feel stuck, try looking for three things:
- Long groups: Which numbers have the least room to move?
- Completed groups: Can you rule out more empty squares?
- Crossing clues: Has something you solved in one direction created an opportunity in the other?
Resist the temptation to fill a square just because it looks like part of the picture.
The picture is the reward for solving the clues, not a substitute for them.
Give it a try
The next time you open Daily Nonogram, don't worry about solving the entire grid immediately.
Look for one square you can prove must be filled.
Then find one you can prove must be empty.
Keep moving between rows and columns, and see how far those first few deductions take you.
Before long, the blank grid won't look quite so mysterious.
Play Daily Nonogram on Uncle Logic and put those deductions to work.