

Minesweeper: How to Spot Hidden Deductions
You've probably seen a 1-2-1 pattern enough times that you recognize it without thinking.
But what about those positions where the numbers don't form anything familiar?
You study the board, check your flags, and eventually decide there's nothing left to do but guess.
Sometimes that's true. Other times, there's a deduction hiding in the way two or three clues overlap.
Here are a few techniques that can help you spot it.
1. Compare what two numbers have in common
Try this small board.
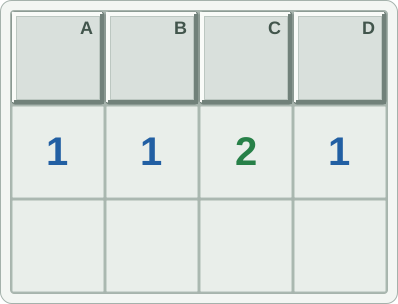
Before reading further, see if you can identify a safe square.
Reveal the shared-neighbor deduction
Start with the first 1. It touches A and B, so exactly one of them contains a mine.
Now look at the second 1. It touches A, B, and C.
Here's the important part.
The first 1 has already told us there's one mine among A and B.
That satisfies the second 1 too.
So C cannot contain a mine.
C is safe.
Now look at the 2. It touches B, C, and D.
Since C is safe, B and D must both contain mines.
That also tells us A is safe.
We just solved all four covered squares by comparing which cells the clues share.
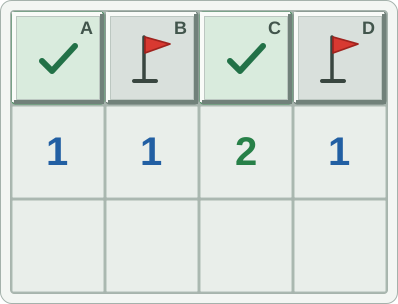
The useful habit here is to stop looking at each number separately. Ask yourself what one clue already tells you about another.
2. Recognize the 1-2-2-1 pattern
Here's a useful formation to recognize when playing Expert.
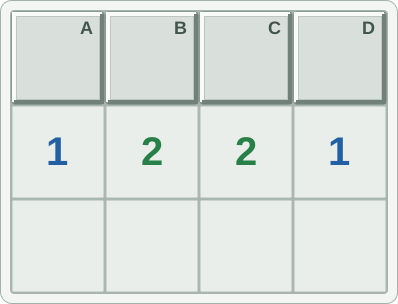
This is the 1-2-2-1 pattern.
When these are the only covered squares touching the clues, it has one solution.
Reveal why the pattern works
The mines are B and C.
A and D are safe.
Here's why.
The left 1 tells us that exactly one of A and B is a mine.
The first 2 touches those same squares, plus C. Since it needs two mines rather than one, C must contain a mine.
Now look at the rightmost 1. It touches C and D.
We've already proved that C is a mine, so D must be safe.
The second 2 touches B, C, and D. With C mined and D safe, B must be the other mine.
That leaves A safe.
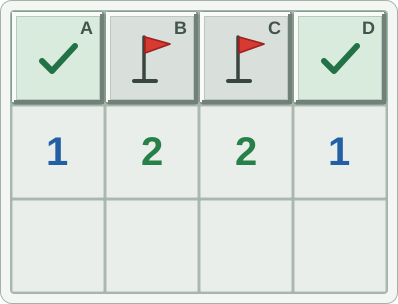
Once you've worked through it a few times, you'll start recognizing the pattern much faster.
But don't memorize the numbers without remembering why they work. If those clues touch additional covered squares, the same shortcut might not apply.
3. Subtract the mines you've already found
Sometimes a familiar pattern is hiding behind larger numbers.
Look at this board. The two flags at the bottom are confirmed mines.
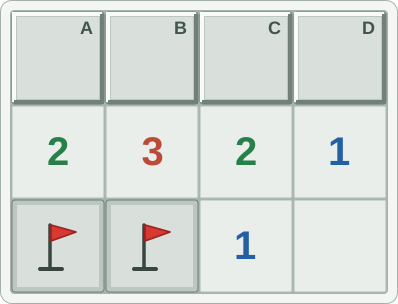
At first glance, 2-3-2-1 doesn't look particularly helpful.
Reveal the reduced clues
But look at the left 2.
It's already touching two confirmed mines. That means its remaining covered neighbors, A and B, are safe.
Now look at the 3.
It also touches those two flags. So it needs just one additional mine among A, B, and C.
We know A and B are safe.
C must contain a mine.
The next 2 is touching the right-hand flag and C, giving it both mines it needs. So D is safe too.
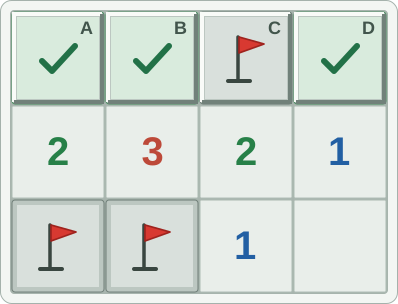
What looked like a complicated series of numbers turned into a simple deduction once we accounted for the mines we'd already found.
You can use this technique almost everywhere.
A 3 touching two confirmed mines only needs one more. A 4 touching three confirmed mines also needs one more.
Mentally reducing the numbers like this can reveal a pattern you wouldn't recognize otherwise.
Just make sure those flags are correct before trusting them.
4. When you're stuck, test what would happen
This next technique is especially useful when you can't find a recognizable pattern.
Consider this board.
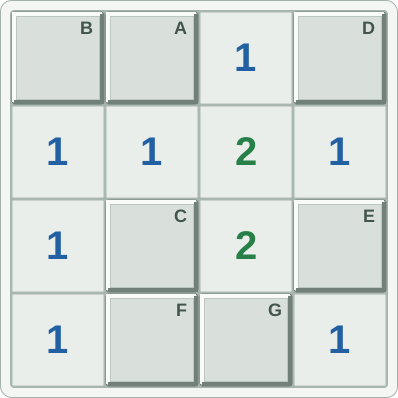
Seven squares are covered. Try figuring out whether B could contain a mine.
The 1 on the left of the second row touches B, A, and C. The 2 near the right touches A, C, D, and E. The rightmost 1 touches D and E.
Could B be a mine?
Test B as a mine
Suppose B contains a mine.
That would satisfy the left 1, so A and C would have to be safe.
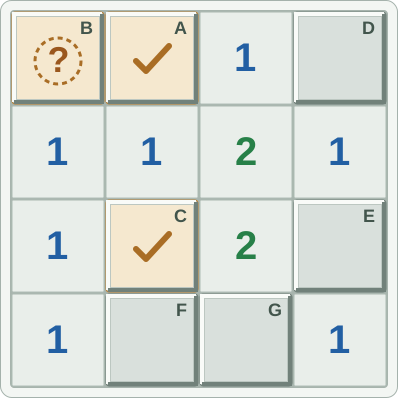
Reveal the contradiction
Now the middle 2 would need both D and E to be mines.
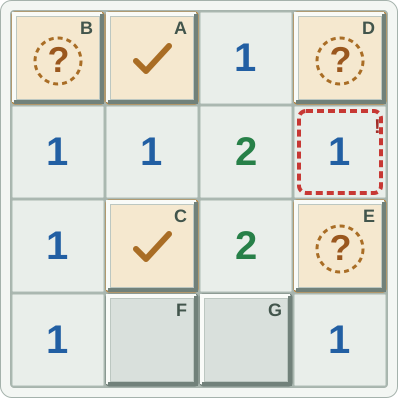
But the rightmost 1 touches D and E. It would have two mines beside it when it only allows one. That is impossible.
So B must be safe.
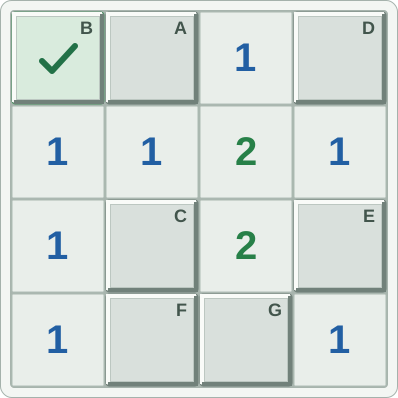
The board still has covered squares we haven't settled. That's fine. We found a safe move without guessing.
We proved a safe move by testing an idea and finding that it couldn't possibly work.
This is a useful technique to remember when the obvious deductions have run out.
You don't need to test every possible arrangement. Sometimes checking just one suspicious square is enough to reveal a contradiction.
5. Be careful with patterns
There's one mistake worth avoiding.
A pattern isn't defined by the numbers alone. It's defined by which covered squares those numbers touch.
A 1-2-2-1 against a clean boundary may give you an immediate solution.
The same numbers surrounded by additional covered squares might not.
And a correctly flagged mine changes how many mines a nearby clue still needs.
That's why understanding the underlying deduction is more useful than simply memorizing what a row of numbers looks like.
A better way to scan an Expert board
The next time you get stuck, try looking for these opportunities:
- Shared neighbors. Do two clues touch almost the same covered squares?
- Different mine counts. Does one clue require exactly one more mine than another?
- Reduced numbers. How many mines does each clue still need after accounting for confirmed mines?
- Contradictions. If a particular square were a mine, would another clue become impossible?
You don't have to check every possibility on every move.
With practice, you'll start recognizing the relationships without consciously going through every step.
And that's where playing Minesweeper becomes especially satisfying.
You start finding safe moves in places where you previously would have taken a guess.
Practice on Uncle's Light Sweep and see how many hidden deductions you can spot.